Showing posts with label lauren. Show all posts

Tuesday, January 21, 2014

Love-Struck


What is Valentine's Day without Cupid?! Paper Smooches' Love-Struck set has the cutest Cupid and Lauren created this card today with him featured. Her card base has two layers of white card stock by Neenah and pink card stock by Bazzill. She also used white card stock to die cut clouds from Lawn Fawn's Blue Skies set and a banner from Lawn Fawn's Stitched Journaling Card set.


She stamped the sentiment onto the banner and Cupid onto a separate piece of white card stock. She glued the clouds in place with some of them adhered with 3D Squares from Scrapbook Adhesives including the banner. Cupid is colored in with Letraset alcohol markers (Tan, Mustard, Ice Grey 1, Ice Grey 2, Cool Grey 1, Blush, Oatmeal, Denim Blue, Sunkissed Pink) and also popped up with 3D Squares.

To add some shine to this card, Lauren included a few pink Twinkle Goosebumps by Queen & Co. and some shimmer around a few clouds and Cupid using At You Spica in Clear.

We love how cute Cupid turned out and encourage you to come into Stamp Fever to see this card in person - the shimmer is hard to see in a photo but so fun in person!

Monday, January 20, 2014

Quill You Be My Valentine


We're back to start the week with another Valentine's Day card by Lauren! For this card, she used the Paper Smooches set, Love-Struck. The card base is three layers - white card stock by Neenah and pink card stock by Bazzill. She stamped the sentiment with Tuxedo Black Memento ink.


On a separate piece of white card stock, she stamped different arrows and colored them in using Letraset alcohol markers in Hot Pink and Sunkissed Pink. Anything colored with Hot Pink was also colored in with an At You Spiza pen in Clear to give it a little shimmer. Lauren cut out the arrows and used 3D Squares by Scrapbook Adhesives to attach the different arrows to the card.

It's a very simple card and would be great to give to anyone - it's not overly done so it would be a great masculine valentine!

Friday, January 17, 2014

Jar of Hearts


Lauren wanted to make some Valentine's Day cards using Paper Smooches Love-Stuck set. Granted, she only ended up using the "heartfelt gratitude" sentiment on this card, but we still love how it turned out! Lauren started with a white base and added layers of red and pink Bazzill card stock. Before gluing on the pink card stock, she stamped teeny tiny hearts from Lawn Fawn to create her own background. Then, she layered on a paper doily and some snippets of seam binding ribbon in pink and red.


The jar filled with hearts is from the Summertime Charm set by Lawn Fawn and Lauren stamped the "heartfelt gratitude" on the label that she used some Lawn Fawn Peace Love Joy Petite Paper. She then wrapped the jar lid with twine.

We love that the card has shades of pink and red, perfect for the holiday!

Friday, December 20, 2013

We R Memory Keepers Punch Boards - Envelope


Today we have a final example of We R Memory Keepers' Punch Boards using the Envelope Punch Board. This is WRMK's first punch board and DT Member Lauren's favorite. Being able to create envelopes for almost any size is such an awesome tool!
 
For this small envelope, Lauren cut out a 5 x 5" piece of paper using Lawn Fawn's Peace Joy Love paper pad. She stamped the sentiment and hearts using Memento inks from Lawn Fawn's Science of Love stamp set. The hearts are attached using pop dots and then tied the envelope close using black baker's twine and some red May Arts Ribbon. A perfect Valentine's Day gift!
 
We hope you enjoyed seeing some ideas this week on how to use your WRMK's punch boards. Come to Stamp Fever to order yours!

Thursday, December 19, 2013

We R Memory Keepers Punch Boards - Pillow Box

 
Today we have TWO examples of how you can use the We R Memory Keepers' Pillow Box Punch Board. First would be a perfect gift card holder or small gift box for Christmas. Lauren used kraft paper by Neenah to create this pillow box and decorated it with ribbon from May Arts and a tag she created. The tag is using Lady Bug Memento ink on a white Neenah paper using a stamp from the Merry Christmas set by Hero Arts + BasicGrey. She tied the tag on using some embroidering floss and added three pears. Santa's beard is also outlined using a shimmer pen.


This second pillow box shows how you can make all kinds of lengths using your Pillow Box Punch Board. The box was punched out of purple patterend paper and Lauren created a cute tag that is tied around the pillow box using purple baker's twine. The small tag is decorated with stamps from Paper Smooches Needle Little Love with the flowers and leaves colored in with alcohol ink markers.
 
Aren't these pillow boxes just the cutest?! Come to Stamp Fever today to order yours!

Wednesday, December 18, 2013

We R Memory Keepers Punch Boards - Candy Box

 
We R Memory Keepers' Punch Boards are so handy for birthdays and holidays to create custom envelopes and packaging. Today's project by Lauren is using the Candy Box Punch Board to create a thank you goodie box that can be used for a party or an event. She cut out her initial patterned paper to create the box at 7 x 7" using Lawn Fawn's Into The Woods Collection. Then decorated the box using orange baker's twine and stamped the Thank You sentiment from Lawn Fawn's Sophie's Sentiments on a small tag. The enamel dots are by Freckled Fawn.
 
Come to Stamp Fever to see how fun these candy boxes are and order yours today!
 

Tuesday, December 17, 2013

We R Memory Keepers Punch Boards - Gift Bag


We R Memory Keepers' Punch Boards are amazing tools to help you make custom envelopes and packaging. Today we have a sample of what you can make using the Gift Bag Punch Board! Lauren used some patterned paper to punch out her gift bag and decorated it using brown baker's twine, brown pearls and created a Merry Christmas sentiment using gold embossing powder and VersaMark on white Neenah paper. The stamp is from Merry Christmas Hero Arts + BasicGrey.
 
Stop by the store this week to see this gift bag as well as the rest of the samples we will be showing our blog this week!

Thursday, November 14, 2013

Basic Grey Season's Greetings Snowflake Card

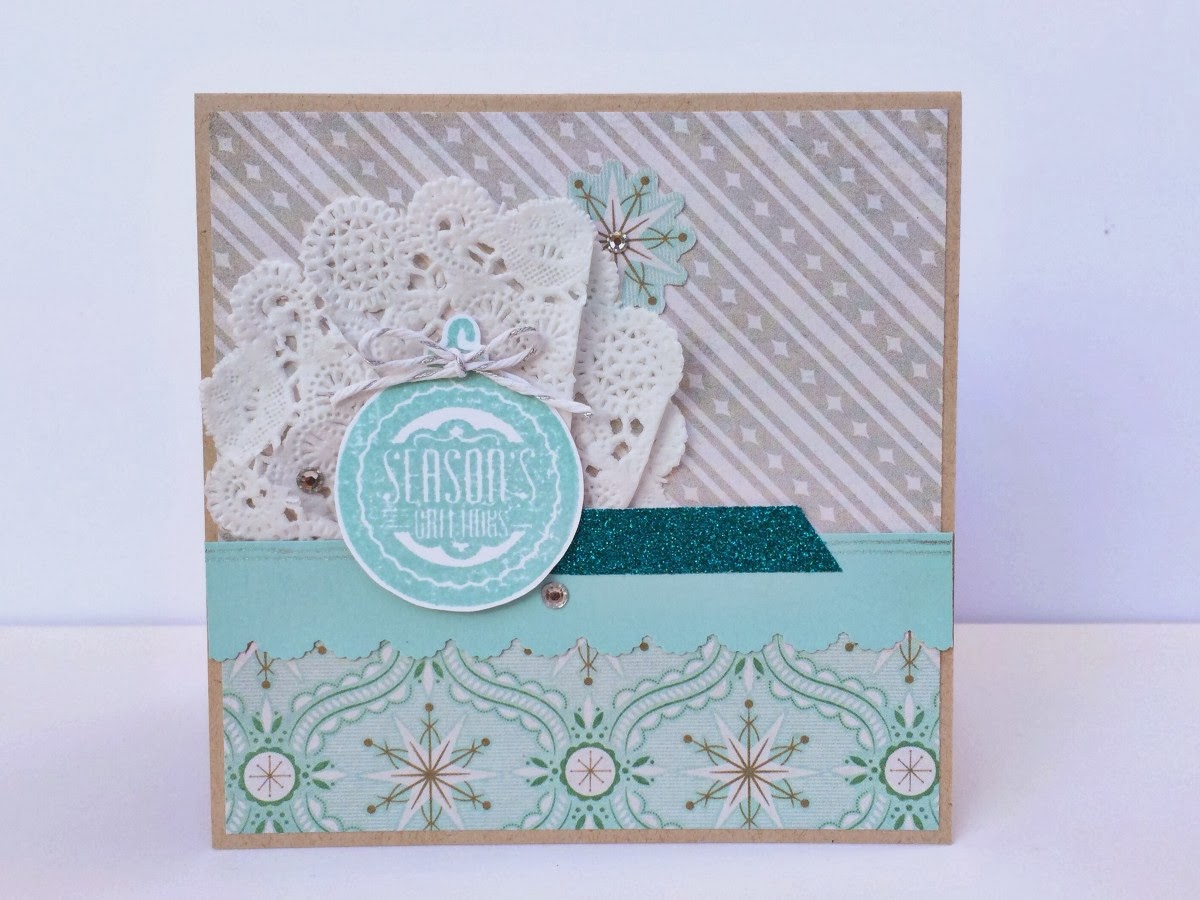
Today we have DT Member Lauren's final card using Basic Grey's Merry Christmas stamp set (with Hero Arts) and Basic Grey's 25th and Pine 6x6" paper pad. This card is themed more for winter and uses the snowflake patterned paper form the set.


Lauren started with a kraft (by Neenah) card base and added some patterned paper from the 25th and Pine paper set. She foled up a doily and also added some blue card stock that was punched using a scalloped border punch by EK Success. Lauren added a little touch of silver using a Silver Gelly Roll pen. The "Seasons Greetings" ornament stamp from the Merry Christmas set was stamped in blue on whilte (by Nennah) and she glued a small ribbon using Lawn Fawn's Silver Lawn Trimmings.
 
 
Before using a 3D Foam Square to attach the ornament, she added a pice of glitter tape (by American crafts). She also cut out one of the snowflakes from the paper and glued it behind the doily, just so it peeked out a bit. There are three rhinestones to add some more "bling" to this festive card.
 
We hope you enjoyed Lauren's cards! She, along with all of our design team members, will be at the store on Saturday for our Holiday Open House with a make 'n take. Make sure to come by and say hi... And do a little shopping! :)

Tuesday, November 12, 2013

Basic Grey Christmas Tree Card

We're back today with more Christmas inspiration for you by DT Member Lauren. She created this Christmas Tree card using Basic Grey's Merry Christmas stamp set (with Hero Arts) and Basic Grey's 25th and Pine 6x6" paper pad.


The card base is kraft by Neenah and she stamped the Christmas tree in green ink on white paper also by Neenah. The patterned paper is from Basic Grey's 25th and Pine. While the tree is from the Merry Christmas set by Basic Grey and Hero Arts, the "Be Merry" sentiment is from Lawn Fawn's stamp set Peace Joy Love and stamped in red chalk ink.
 
 
Lauren crated the stitching look using a Silver Gelly Roll pen. Lauren likes to add a little "bling" to her cards and she used gold glitter on the tree and gold glitter tape by American Crafts. Finally, a little green seam binding ribbon to give the card some texture and dimension.
 
Come back to the blog on Thursday to see Lauren's final card using the Basic Grey products!

Monday, November 11, 2013

Basic Grey Ornament Card

Happy Monday! Today we have some Christmas inspiration for you. DT Member Lauren created this ornament card using Basic Grey's Merry Christmas stamp set (with Hero Arts) and Basic Grey's 25th + Pine 6x6" paper pad.
 

The card stock is kraft and white by Neenah and some blue paper from her stash (we'll be carrying Bazzill so you'll be seeing projects featuring Bazzill paper soon). She used red, pink and blue inks for the oraments and added a small rhinestone to each one. The ornaments are "hanging" using Lawn Fawn's silver Lawn Trimmings and there is some twine also tied around in a bow. The December 25 sentiment is also stamped in red and attached using Tim Holtz's Tiny Attacher.
 
We'll be featuring two more cards this week from Lauren using Basic Grey Christmas products so come back to the blog tomorrow!


Tuesday, October 22, 2013

Leaves Autumn Harvest Card

Lawn Fawn products are so versatile and can be used with other stamps and products you may have in your craft stash. Today we have a card from DT Member Lauren showing how she used Lawn Fawn's leaves dies with Hero Arts Autumn Leaves stamp set.


Lauren used a cream card stock for her base and to stamp the "Leaves Autumn Harvest" banner sentiment. Then using her die cut machine, ran the Lawn Fawn leaves dies through in different colored cardstock: yellow, orange, red and brown. Perfect Autum Leaf colors! She layered the leaves in the center of the card and glued down some Lawn Fawn Trimmings in a loopy pattern.


The sentiment is adhered to the card using 3D squares and there's a few rhinestones in there to add a little shine to the card. This is her favorite card using the Autumn Leaves set. She recomments this set on this sentiment alone! :)
 
Are you getting ready for Fall? What products are you favorite for this time of year?

Monday, October 21, 2013

Hero Arts Thankful Card

Happy Monday, stampers! We're excited to show you some more inspiration of how you can use the product we sell at Stamp Fever at home. Today we have a card by DT Member Lauren using Hero Arts' set Autumn Leaves.
 

Lauren used the leaf, acorn and "Thankful" scalloped circle sentiment on this card. She used Versarmark to create the background of leaves and acorns on the kraft paper. There really was no certain pattern she was going for, just stamped them in random places and make sure she changed the way the stamp faced.


One of her favorite products that we have at Stamp Fever is the heart wood grain washi tape from Freckled Fawn. It's pretty darn cute! She ripped a piece off and placed it directly to the card. Lauren stamped the sentiment on white card stock three times - once each in brown, orange and yellow ink. She layered them all together using 3D squares and added some Stickles to the dots in the scallops for a little bling. :)
 
Do you use washi tape on your cards or other projects? What is your "go to" washi right now?

Friday, October 18, 2013

Thanksgiving Treat Box

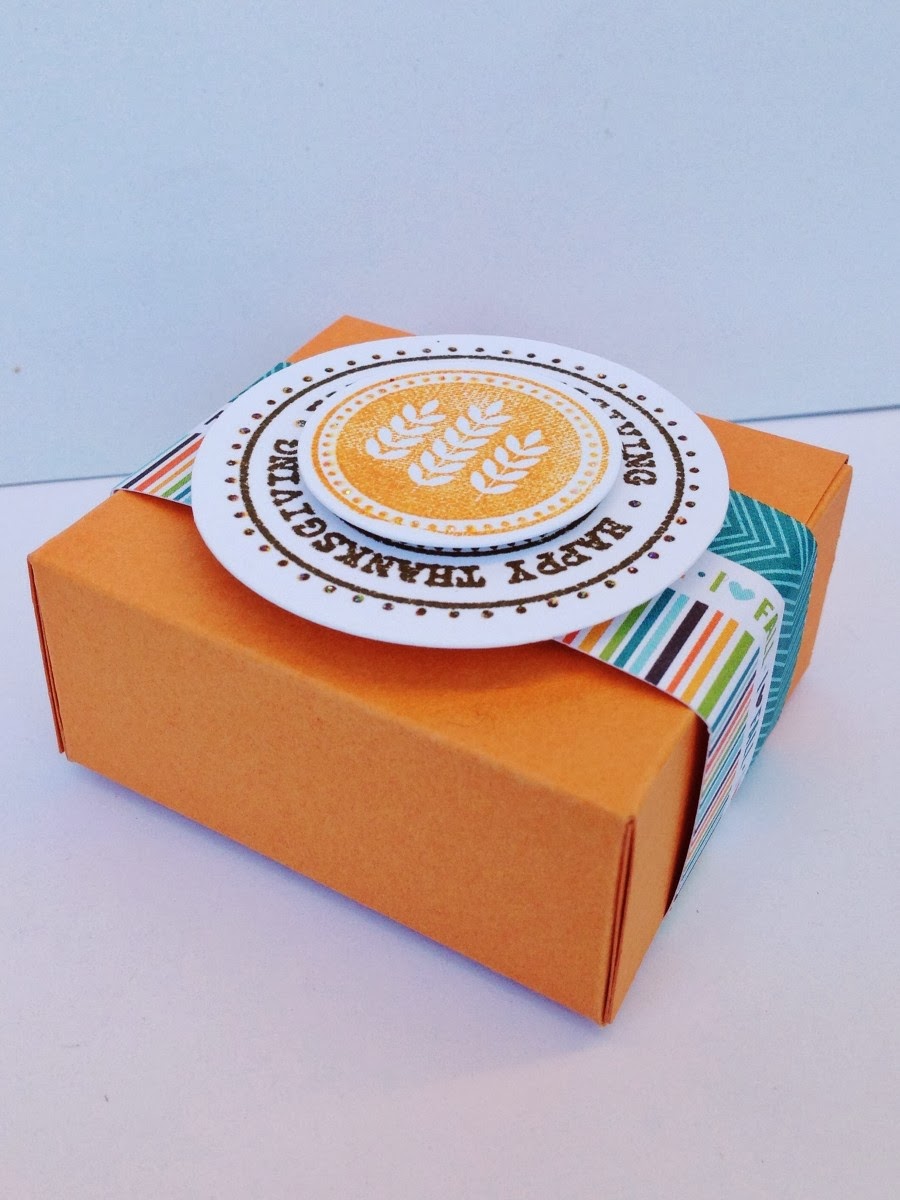
Looking for some inspiration to use your stamps other than on a card? DT Member Lauren made this treat box using a Splitcoaststampers tutorial for inspiration. Check it out! 
 
 
Lauren used the tutorial to create the box out of orange card stock. On white card stock, she stamped the "Happy Thanksgiving" circle sentiment from Hero Arts stamp set Autumn Leaves in brown and orange ink. She used a circle tool to cut out the two stamped images and layered them with 3D squares. She wrapped a piece of Lawn Fawn's Into the Woods 6 x 6" paper. It didn't quite fit all the way around, but the circle keeps the paper in place.


When you wrap around the paper and keep in place with 3D squares under the circle pieces, make sure you can still slide the wrap off so you can get inside the treat box! These are perfectly sized for Ghirardelli squares! We hope you try this project on your own. Come on by Stamp Fever this weekend to get some supplies. :)

Thursday, October 10, 2013

Lauren's Memory Box Projects - We Moved Card

Today we have Lauren's last project using the Memory Box stamp Spooky Mansion. One difficult thing about buying holiday themed stamps is wondering how you can use them throughout the rest of the year. Lauren's card is a great example of using a Halloween stamp in a non-Halloween way!
 
 
Lauren stamped the mansion stamp in VersaMark and embossed it in white, but didn't stamp the moon part of the stamp. It doesn't look too spooky when it's stamped and embossed in white! She used Neenah paper in white and kraft for this card and used Lawn Fawn products as well. The Stitched Journaling Card die and twine are some of Lawn Fawn's new products. The sentiment "We Moved" is also a Lawn Fawn sentiment but you could also stamp a congratulations if you know someone who just moved to a new home!
 
We hope you enjoyed seeing how you can use a Halloween stamp this week in different ways. We hope to see you this afternoon at our Impression Obsession Treat Make 'n Take!

Tuesday, October 8, 2013

Lauren's Memory Box Projects - Trick-or-Treat Bag

The second project DT Member Lauren created using Memory Box's stamp Spooky Mansion is this fun Trick-or-Treat bag!
 

To make this mag, she used a muslin bag and Memento ink to stamp onto the bag. The Trick-or-Treat sentiment is by Lawn Fawn. The three ribbons she chose are from May Arts and layer perfectly. And there's a little touch of glitter usign Stickles around the moon of the Memory Box Spooky Mansion stamp.
 
Isn't this bag fun? It would perfect to use as goodie bags filled with candy for Halloween! Leave a comment if you have any questions for Lauren on how she made this bag.


Speaking of Halloween... DT Member Lynette has a really neat class coming up on Saturday, October 19th. Head over to our Classes and Events page for more information.

Monday, October 7, 2013

Lauren's Memory Box Projects - Spooky Mansion


We are continuing this week to bring you inspiration on how to use your stamp sets in creative ways or maybe use the set that's themed for a certain holiday for something different! You can see all of the Design Team's work at Stamp Fever so come on by.

This week, DT Member Lauren has three projects using a set from Memory box called Spooky Mansion. The first project is a card using the spooky mansion as an actual... spooky mansion. :)


Lauren used distressing ink to color the sky and ground and alcohol markers to color in the stamp. She used dimensionals (in black!) to give the scene some depth. The moon is also outlined with Stickles to give the card a little bling. The background paper is from October Afternoon's Witch Hazel collection.

Leave a comment if you have any questions about this spooky card for Lauren!