Hi Everyone, Nancy here with a photo tutorial of a technique for stamping with water. This is a fun technique that results in wonderful batik-like patterns and textures. I used Distress inks for this technique because they are designed to react with water. For a different look you can use Pearly Water to add some sparkle and shine!
Supplies used:
White Cardstock- I used Neenah Solar White
Kraft Cardstock- Neenah Desert Storm
Stamps: Hero Arts Daisy Outline Pattern S5472; Lawn Fawn Swimsuit Season (swimsuit and sentiment)
Inks: Distress inks-Shaded Lilac, Peacock Feathers, Squeezed Lemonade, Ripe Persimmon. Memories Black Dye ink, Versamark Watermark Stamp Pad
Tools: We R Memory Keepers Corner Chomper, Inkssentials Mister bottle, Fiskars paper trimmer, EK Success 2" Circle Punch, Heat Tool
Other Supplies: Scrapbook Adhesives 3D Foam Squares, Large Glue Dots, May Arts Ribbons and Trims
Let's get started:
Start by trimming down some white card stock to 2- 3" strips. Using an ink blending tool or direct to paper apply inks to the paper, getting good coverage.
Trim each inked side to a 1.25" strip and assemble on copy paper with removable adhesive.
Ink your stamp with Versamark, make sure it's good and inked! Give the inked rubber a couple of light mists from the mister; the water should bead up on the stamp but avoid getting it too wet. Stamp on your prepared strips holding the stamp in place for about 15 seconds to let the water penetrate the paper.
When you first remove the stamp you may not like how it looks, but give it time for the water to react with Distress ink.
If you are impatient (like me) you can use a heat tool to speed up the drying process. Once dry you will have a unique texture and stamped pattern on your cardstock. Remove the paper strips from the copy paper backing.
NOTE: Please do not use a heat tool directly on your self healing cutting mat. The heat will warp the mat. I hold my paper over a ceramic tile to heat when using embossing powder or for general drying. This photo is just for demonstration purposes.
To finish my card I stamped the Daisy Outline Pattern with Shaded Lilac on a white card stock background panel. I spritzed my stamp lightly before stamping with it to achieve a softer water color look. I trimmed the inked and water stamped panels to 1.75" high and adhered them to my background.
I stamped the swimsuit with black ink on a leftover piece of the Shaded Lilac inked panel and cut it out. Then I used the stamping with water technique to give the swimsuit a fun pattern.
I punched a 2" circle and stamped the Daisy Outline Pattern in Squeezed Lemonade then stamped the "keep cool" sentiment in black ink. This circle was trimmed and adhered to the panel.
I added some May Arts ribbon and trim, layered the swimsuit on the piece of woven trim and rounded the bottom corners of the panel before mounting it to a standard size kraft card base.
Here's my finished card:
and a close up of the water stamped detail:
I hope enjoyed today's Design Team Wednesday Tutorial and that you will use this fun technique to add some interesting texture to your stamped cards and projects.
Please leave us a comment and tell us what you think about the blog, the Wednesday feature, this tutorial....whatever, we want to hear from you!
Have a great Wednesday!
Showing posts with label nancy. Show all posts
Wednesday, June 6, 2012
Wednesday, May 30, 2012
Design Team Wednesday
Hi Everyone, Nancy here with this week's Design Team Wednesday offering.
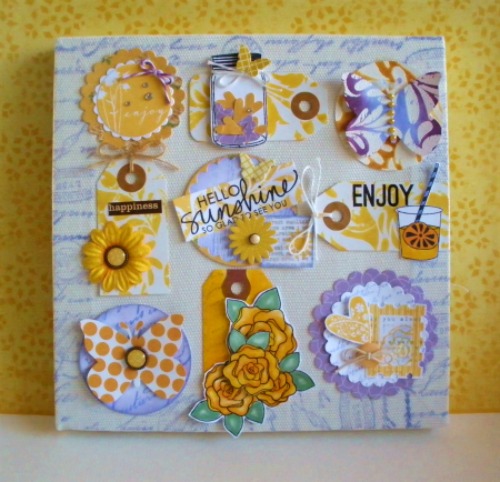
I recently finished my Stamping 103 series of classes and we ended with a creative free-for-all. I would like to share with you the fabulous projects that my talented class created.
We worked on 8x8 Canvas Collage Samplers, this is my finished canvas:
Here's how the fun unfolded:
I recently finished my Stamping 103 series of classes and we ended with a creative free-for-all. I would like to share with you the fabulous projects that my talented class created.
We worked on 8x8 Canvas Collage Samplers, this is my finished canvas:
Here's how the fun unfolded:
Jacquie, Carol, Sue, Barbara and Kim
Anne, Karen, Sondra, Lee Anne and Lauren
Carol working on her elements
Jacquie's cooking on all burners....
Lee Anne's canvas is going to be pretty in pink
Barbara laying out her main elements
Anne's got some great ideas for her canvas
Sue is working with shades of purple....she's even color coordinated her outfit!
Jacquie, Carol and Sue share a laugh
Kim is hard at work on her masterpiece
Sondra's work in progress
Karen is working on arranging her elements
Jacquie's canvas is getting there...
Sondra's Canvas...almost finished
Sue's finished canvas
Tomorrow is the last day to enter to win some great Faber-Castell Design Memory Craft Products on my blog. Click HERE for all the details and ways to enter!
Sunday, November 20, 2011
Many Thanks to all of the Stamp Fever Family
We wish you all a very Happy Thanksgiving and hope you find some time for some inky creativity over the holiday. Stamp Fever will be closed November 24th through the 27th for Thanksgiving.
We have some great classes and events scheduled next week, here's the run-down:
Tuesday November 29 and Thursday December 1- Nancy's Christmas Card Class. 6pm
Wednesday November 30- Jennie Black Copic Class; card samples are HERE.
Saturday December 3- Card Kit Club Demo 9-11am Sample will be posted soon.
Gina's "Explosion Box" Class 1pm- samples up soon.
Nancy's Christmas Card Class- You will make 2 cards and one very special gift tag.
This is a fun window style card that doubles as a holiday decoration. It uses the Hero Arts Holiday Cheer Stamps and Die Cuts set.
A rustic style card using Hero Arts Starry Night and Music Background.
And a Wood tag/ornament decorated with Perfect Pearls (the photo doesn't show the sparkle very well) and a die cut tag. This tag also uses Hero Arts stamps: Holly Flourish Background, Holly Flourish Border and sentiment.
Sign up today! The cost for this class is $15.00. The Thursday class is almost filled; there are openings in the Tuesday class, the first 10 get in. Call Linda to reserve your spot at 714 974-3552.
We have some great classes and events scheduled next week, here's the run-down:
Tuesday November 29 and Thursday December 1- Nancy's Christmas Card Class. 6pm
Wednesday November 30- Jennie Black Copic Class; card samples are HERE.
Saturday December 3- Card Kit Club Demo 9-11am Sample will be posted soon.
Gina's "Explosion Box" Class 1pm- samples up soon.
Nancy's Christmas Card Class- You will make 2 cards and one very special gift tag.
This is a fun window style card that doubles as a holiday decoration. It uses the Hero Arts Holiday Cheer Stamps and Die Cuts set.
A rustic style card using Hero Arts Starry Night and Music Background.
And a Wood tag/ornament decorated with Perfect Pearls (the photo doesn't show the sparkle very well) and a die cut tag. This tag also uses Hero Arts stamps: Holly Flourish Background, Holly Flourish Border and sentiment.
Sign up today! The cost for this class is $15.00. The Thursday class is almost filled; there are openings in the Tuesday class, the first 10 get in. Call Linda to reserve your spot at 714 974-3552.
Subscribe to:
Posts (Atom)